Jenkins CLI Agent as Windows Service: Setup & Best Practices

Prerequisites

Before proceeding, ensure you have:
✅ A running Jenkins master instance
✅ Java installed on the agent machine
✅ Administrator access on the Windows machine
✅ Winsw.exe package Download Link

Step 1: Download the Jenkins Agent JAR

  1. From your Jenkins dashboard:
    1. Navigate to Manage Jenkins > Nodes.
    2. Click New Node, select Permanent Agent, and configure it (set the remote root directory, labels, etc.).
    3. Under Launch method, choose Launch agent via Java Web Start.
    4. Save the node configuration.
  2. Get the agent JAR URL:
    1. Click on the newly created node to open its status page.
    2. Copy the agent JAR URL (e.g., http://your-jenkins-server:8080/jnlpJars/agent.jar).
  3. Prepare the agent machine:
    1. Create a directory named JenkinsAgent on your Windows agent machine.
    2. Open Command Prompt in the newly created directory.
  4. Download the agent JAR:
    • curl http://your-jenkins-server:8080/jnlpJars/agent.jar -o agent.jar

Step 2: Creating the Requirement Files

  1. Download WinSW:
    1. Download the winsw.exe package from the official repository
    2. Save the file to your JenkinsAgent directory
  2. Rename the executable:
    1. Rename winsw.exe to JenkinsAgent.exe in the directory
  3. Create the configuration file:
    1. In the same directory, create a new file named JenkinsAgent.xml
  4. Verify your files:
    1. After completing these steps, your directory should contain these three files:

Step 3: Configure the service

  1. Edit the 
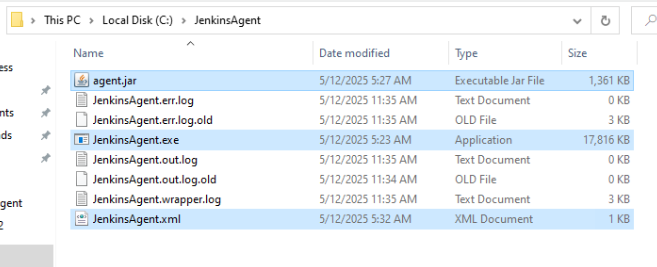
JenkinsAgent.xml file and populate the following fields:
    1. <id>
    2. <name>
    3. <executable>
    4. <arguments>
    Example configuration template:
<service>
  <id> Service ID e.g (jenkinsagent) </id>
  <name> Agent Name e.g (JenkinsAgent) </name>
  <description>This service runs the Jenkins Agent as a Windows service.</description>
  <executable> Java Path </executable>
  <arguments>-Xrs -Xmx256m -jar "%BASE%\agent.jar" -url http://your-jenkins-server:8080/ -secret YOUR_AGENT_SECRET -name windows -webSocket -workDir "D:\Jenkins"</arguments>
  <log mode="roll" />
  <onfailure action="restart" />
</service>

2. After updating the values, your file should resemble this example:

<service>
  <id>jenkinsagent</id>
  <name>JenkinsAgent</name>
  <description>This service runs the Jenkins Agent as a Windows service.</description>
  <executable>C:\Program Files\Common Files\Oracle\Java\javapath\java.exe</executable>
  <arguments>-Xrs -Xmx256m -jar "%BASE%\agent.jar" -url http://10.100.28.55:8080/ -secret 52b81a02183007dbaaafbc8decaabe9ba34906828132c432 -name windows -webSocket -workDir "D:\Jenkins"</arguments>
  <log mode="roll" />
  <onfailure action="restart" />
</service>

3. Save the file after making changes.

Step 4: Install the service

  1. To install the service, Open Command Prompt as Administrator.
  2. Navigate to the JenkinsAgent directory by running:
    • cd C:\JenkinsAgent
  3. Install the service by executing:
    • JenkinsAgent.exe install

Step 5: Start the service

  1. Open the Service Manager on the agent machine:
    1. Press Win + R, type services.msc, and hit Enter.
    2. Locate the service name you specified in the <id> field of your configuration file.
  2. Configure the Service Account:
    1. Right-click the service and select Properties.
    2. Navigate to the Log On tab.
    3. Enter the credentials for the service account under which the agent should run.
    4. Click Apply, then OK.
  3. Start the Service:
    • Right-click the service again and select Start.
  4. Verify the Service Status:
    • Option 1: Check the agent’s connection status in the Jenkins UI under Manage Jenkins > Nodes.
    • Option 2: Inspect the logs in the JenkinsAgent directory:

Leave a Comment

Your email address will not be published. Required fields are marked *

Scroll to Top